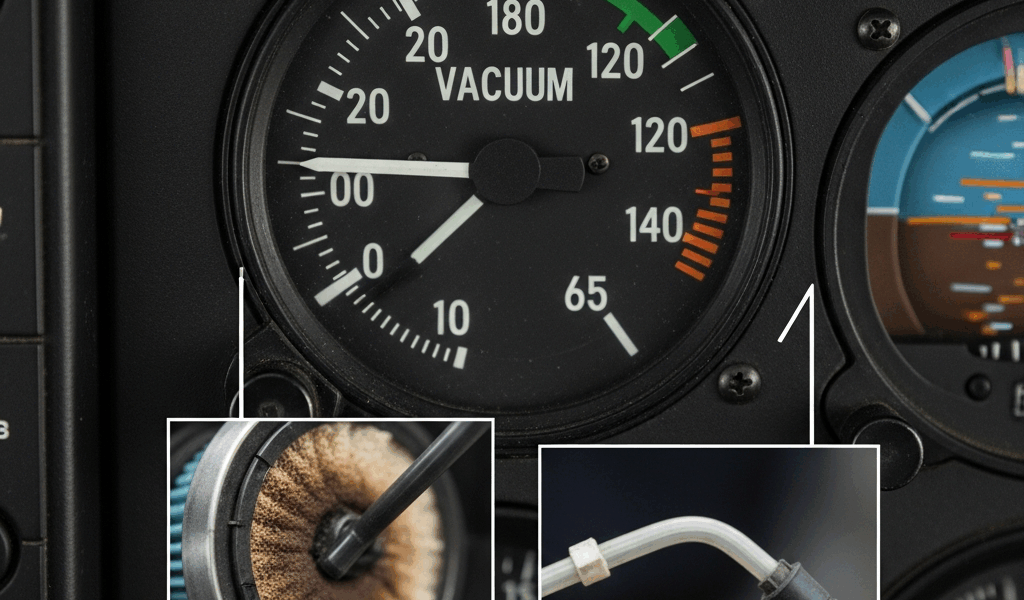
Why Your Vacuum System Gauge Fluctuates in Flight
Vacuum system failures have gotten complicated with all the misdiagnosis flying around in general aviation forums. I’ve spent the better part of a decade flying Cessna 172s and Piper Cherokee Six aircraft, and I can tell you with absolute certainty that these gremlins are the sneakiest instrument problems you’ll encounter. Your gauge starts dancing erratically at 2,500 feet, your attitude indicator begins acting up, and suddenly you’re convinced everything’s failing. But here’s what I learned the hard way — and what took me way too long to figure out — the real culprit is almost always the vacuum pump itself, not the instruments it powers.
The vacuum system gauge fluctuates in flight because your engine-driven vacuum pump is slowly deteriorating, creating inconsistent pressure delivery to your gyroscopic instruments. This isn’t instrument lag or a minor hiccup. This is a mechanical component breaking down in real time, and recognizing the pattern could mean the difference between a controlled diversion and an inadvertent attitude indicator failure at night.
What a Failing Vacuum System Actually Looks Like
Probably should have opened with this section, honestly. The progression of a vacuum system failure follows a predictable pattern that most pilots never see coming.
In the early stages, you’ll notice the vacuum gauge — that little round instrument typically mounted on the lower-left side of the panel — creeping slowly downward. Normal vacuum system pressure runs between 4.5 and 5.5 inches of mercury, or inHg. You’re cruising along, glancing at it every few minutes the way you should, and you notice it’s settled at 4.2 inHg instead of 4.8 inHg. Not a massive drop. Easy to miss if you’re not actively scanning.
The needle will then start exhibiting what I call “jittery behavior.” It won’t hold steady. Instead of sitting at one point, it’ll oscillate between 4.1 and 4.6 inHg, moving in small, rhythmic jerks that correspond loosely with engine RPM changes. This phase can last anywhere from one flight to several weeks, depending on what’s actually failing inside the pump.
Then comes erratic fluctuation. The gauge swings wildly — 4.8 down to 3.2 back up to 4.6 — without any correlation to power settings. Your attitude indicator starts acting disagreeable at this point. The gyroscope inside can’t maintain adequate spin speed without steady vacuum pressure, so it begins to precess. You’ll see the miniature airplane tilting when it shouldn’t be, or holding a climb attitude that doesn’t match your actual pitch.
The failure pattern hits different aircraft types with different severity. Cessna 172s and Piper Cherokees rely almost exclusively on vacuum power for their attitude indicator, heading indicator, and vertical speed indicator. Older Mooneys — 1960s and 1970s models especially — often have vacuum-dependent autopilot systems too, which means a pump failure cascades into autopilot disconnect plus instrument unreliability. Mooney 201 and 231 models are particularly dependent on vacuum system integrity because they were designed with mechanically complex vacuum-powered trim systems.
The absolute worst phase is hard failure. The gauge drops to zero. Your attitude indicator tumbles. Your heading indicator precesses wildly. If you’re flying in clouds, you’ve just lost your primary pitch-and-bank reference. This phase happens fast — sometimes within seconds of severe fluctuation.
Why Pilots Blame the Wrong System First
Here’s the psychology that gets us every single time.
You’re scanning instruments. Your attitude indicator needle moves. Your brain immediately says “the attitude indicator is broken.” It’s a direct cause-and-effect perception that feels completely logical. You see an instrument misbehaving, you blame the instrument. But what’s actually happening is that the vacuum pump is delivering erratic pressure, the gyroscope inside the attitude indicator can’t spin at constant velocity, and the instrument is responding exactly as designed to bad input — not because it’s mechanically failed, but because its power supply is unstable.
Pilots often mistake vacuum failure for AI failure so frequently that I’ve watched experienced aviators declare a perfectly serviceable attitude indicator as “tumbled” or “unreliable” when the real problem sits six inches away on the vacuum gauge.
The HSI, or horizontal situation indicator, makes this worse. When vacuum pressure drops below 4.2 inHg, the HSI gyroscope slows down and the card begins to precess — slowly drifting off your actual heading. You notice the HSI showing 185° when your compass shows 195°. Naturally, you think “the HSI has precessed” and make a mental note to get it fixed. But again, you’ve got a vacuum pump that’s dying, not an HSI that’s broken.
That’s what makes vacuum system failures endearing to no one — they masquerade as instrument problems so effectively. The attitude indicator gets blamed for tumbling when the real cause is intermittent vacuum starvation. The vertical speed indicator gets blamed for fluctuating when it’s actually responding to real pressure oscillations from a failing pump. This misattribution delays proper diagnosis and repair because pilots base their maintenance decisions on instrument malfunction rather than system malfunction.
I made this exact mistake in 2019 flying a Piper Cherokee with a vacuum gauge that was bouncing between 4.0 and 5.1 inHg. I convinced myself the attitude indicator had a mechanical issue with its gimbal system. I filled out maintenance request forms asking for “AI overhaul.” The mechanic checked the system pressure, found a carbon-clogged vacuum pump intake filter, replaced it, and the problem vanished completely. The attitude indicator was never broken — it was just starving for consistent power. Don’t make my mistake.
In-Flight Checks You Can Do Right Now
These checks take maybe ninety seconds total and can confirm whether you’re dealing with a vacuum system failure or an actual instrument problem.
First check — the vacuum gauge itself. Look at your vacuum system pressure gauge. Normal operating range is 4.5 to 5.5 inHg. If your gauge reads consistently below 4.5 inHg, you have a vacuum system problem. If it’s fluctuating more than 0.3 inHg in any thirty-second window, you have a vacuum system problem. Write down the exact reading. This detail matters.
Second check — cross-reference your attitude indicator against the outside horizon. Bank gently to a 15-degree angle and look out the window. Does the wing line match the horizon? Does the pitch attitude look reasonable? If your outside reference doesn’t match your attitude indicator, your AI might be unreliable. If they match perfectly, your AI is fine — the vacuum fluctuation is just making it slightly jumpy, but it’s still accurate.
Third check — look at AI tumbling specifically. A truly tumbled AI shows pitch angles beyond ±85 degrees or bank angles beyond ±120 degrees. The miniature airplane will look completely inverted or sideways. Wobbling or minor oscillation is not tumbling. That’s just the gyroscope hunting for center due to low vacuum pressure.
Fourth check — verify HSI heading against magnetic compass. If your HSI is precessing, it should disagree with your magnetic compass by a steady amount — drift is progressive. If it matches within 2 degrees, your HSI is fine. Note: remember that your magnetic compass lags in turns, so compare headings in straight and level flight.
Now for the decision logic. If your vacuum gauge reads normal — 4.5 to 5.5 inHg steady — but your instruments are acting weird, you probably have an instrument problem that needs a mechanic. If your vacuum gauge is low or fluctuating, but your attitude indicator matches the horizon and your HSI matches the compass, you’ve got a vacuum system losing pressure but instruments still performing. That’s different. If your vacuum gauge is low AND your attitude indicator doesn’t match the horizon AND your HSI is precessing, you need to prepare for partial-panel operations immediately.
When to Divert and What Causes Pump Failure
The decision to divert depends on three factors — your current flight conditions, your instrument flying capability, and the severity of what you’re seeing.
If you’re VFR in clear weather with good visibility, vacuum system issues are manageable. You can fly your airplane with just the magnetic compass, airspeed indicator, and altimeter. Land at the nearest airport and get maintenance.
If you’re IMC — instrument meteorological conditions — in clouds, vacuum system failure means you’re flying on partial panel. Your attitude indicator is unreliable. Your HSI is unreliable. If you’re trained and current in partial-panel flying, you can do this. If you’re not, divert immediately to VMC conditions or the nearest airport with an instrument approach.
What actually kills vacuum pumps? The most common cause by far is contamination in the intake air filter. Your vacuum pump pulls air through a filter — typically a small cartridge element located on the engine side — to prevent dust and debris from entering the pump itself. When that filter becomes clogged with engine oil vapor, dust from the air intake, or carbon particles, the pump has to work harder to pull the same amount of air. Pressure drops. The pump heats up. If you don’t replace the filter, the carbon vanes inside the pump start wearing prematurely. That’s when things get expensive.
The second major cause is worn carbon vanes. These are small rectangular carbon blocks inside the rotating pump rotor that seal against the pump housing and create the pressure differential. They wear down over time — typically 500 to 1,200 hours depending on maintenance and operating conditions. When they wear, they can’t seal effectively, and pump pressure drops. A worn pump will show slow pressure loss initially, then erratic fluctuation as the vane seals become inconsistent.
Vacuum hose deterioration and cracks rank third. Those rubber hoses between your pump and instruments have a lifespan. They get brittle. They crack. Tiny air leaks develop and destroy your system pressure. I once traced a pressure drop from 4.8 inHg down to 3.6 inHg to a hairline crack in the hose running from the pump to the pressure relief valve — completely invisible until a mechanic pressurized the system and heard the hiss.
Bearing failure inside the pump is less common but catastrophic. The pump rotor sits on bearings that eventually wear out. When a bearing fails, the rotor wobbles, vane seals break down, and you lose pressure rapidly.
Typical pump time between overhaul, or TBO, is 1,200 flight hours for most general aviation aircraft. Some manufacturers recommend earlier inspection at 500 hours. If your aircraft has a pump with unknown or marginal time, you’re flying on borrowed luck.
Recovery and Prevention
Post-flight, you need to take three specific steps if you experienced vacuum system fluctuation.
Inspect the vacuum pump air filter immediately. It’s usually located on the firewall near the vacuum pump, accessible from the engine compartment. The filter element looks like a small cylinder — roughly 2 inches in diameter and 3 inches long. Remove it and hold it up to light. If light doesn’t pass through easily, it’s clogged. A clean filter should be nearly transparent when backlit. Replacement filters cost $15 to $35 and take fifteen minutes to swap. While you won’t need specialized tools, you will need a flashlight and maybe a small screwdriver.
Check all vacuum system hoses for integrity. Look for discoloration, cracks, splits, or obvious deterioration. Squeeze them gently — they should be slightly flexible but firm. If they’re rock hard or crumbling, they need replacement. Vacuum hoses typically cost $5 to $15 per foot installed, but the peace of mind is worth it. I’m apparently someone who’s replaced vacuum hoses three times, and the third time they worked while the second replacement never seemed quite right until I finally pushed for a full system inspection.
Monitor your vacuum gauge over your next five to ten flights. Log the readings. If pressure is steady at 4.8 to 5.2 inHg across all flights, you’ve probably just needed a filter change. If pressure slowly decays over multiple flights from 5.0 down to 4.4, your pump is wearing and you should schedule replacement within the next 25 to 50 flight hours. If you see sudden pressure drops — 5.0 down to 2.8 in one flight — you have a hose leak or imminent pump failure. Ground the aircraft and get it diagnosed before flying again.
Schedule your vacuum pump replacement during regular maintenance. Most vacuum pump rebuilds or replacements happen during 100-hour inspections. Cost runs between $400 and $700 for a pump replacement plus labor. A pump rebuild, if available for your model, runs $250 to $450. The replacement interval varies by aircraft and engine hours accumulated, but the general rule is don’t exceed 1,200 hours without overhaul.
Your vacuum system isn’t going to fix itself, and fluctuation today means failure tomorrow. Catch it early, and you’ll avoid the real panic of a tumbled attitude indicator in clouds with nowhere to go but down.


Stay in the loop
Get the latest aviation data updates delivered to your inbox.